

Appearance
Managing Staff
Manage staff drivers and volunteer drivers who are assigned to bookings on your team's schedule.
View staff
- Go to Operations.
- Click Staff.
- Review the list or open a tab:
- All staff
- Staff driver
- Volunteer driver
Use Filters to find staff with training, compliance, licence, or availability issues.
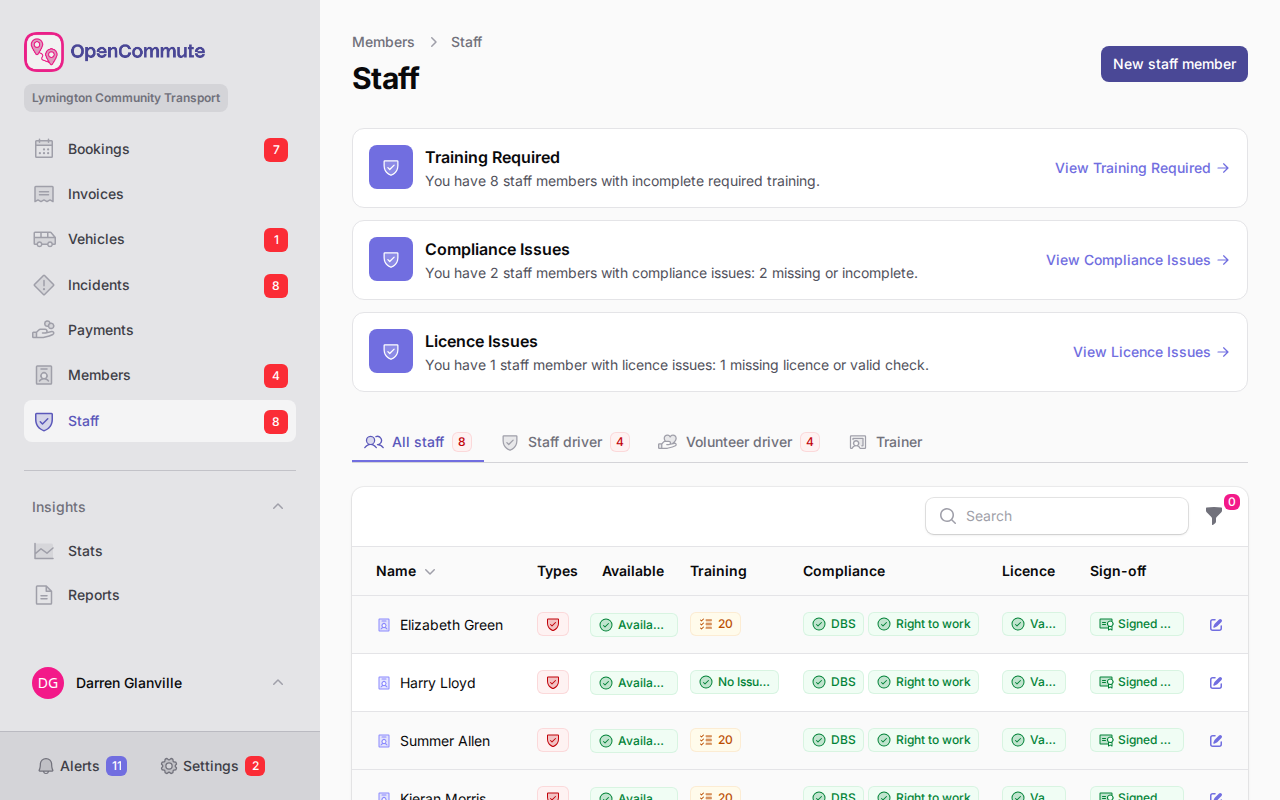 An example of the Staff list showing driver types and availability status.
Add a staff member
- Go to Operations.
- Click Staff.
- Click New staff member.
- Enter Name and Email.
- Tick Staff driver, Volunteer driver, and/or Trainer as needed.
- Click Create.
- Staff driver — assigned to internal, open, and group bookings on your staff schedule
- Volunteer driver — assigned to one-to-one member trips
- Trainer — can be assigned to training bookings and sign off attendee pass or fail outcomes
Photo
Add an optional photo. Images are automatically resized to a maximum of 800px.
When creating a staff member:
- Go to Operations > Staff > New staff member.
- Upload a JPEG, PNG, or WebP file in the Photo field to the left of Name.
- Click Create.
On an existing staff member:
- Open the staff member.
- On Details, click Add photo or Change photo.
- Upload a JPEG, PNG, or WebP file.
- Click Save photo.
The photo is shown to the left of Name on the staff record. Only signed-in team members can open the stored file.
Contact details
Use the Contact section on the Details tab to store a phone number and driver notes.
- Open the staff member (or enter these fields when creating a new staff member).
- On Details, find the Contact section.
- Enter Phone number and Driver notes as needed.
- Click Save on the staff record.
Driver notes are shown on bookings when this person is assigned as a driver.
Who can see contact details
Only platform users, volunteer drivers, and staff drivers can view phone numbers and driver notes.
Emergency contact
Staff members can store an emergency contact in the member app. On the platform, emergency contact details are opened from Details and are protected by an access log.
Add emergency contact
You can add emergency contact details when creating a staff member, or later from the Emergency contact button on Details.
When creating a staff member:
- Go to Operations > Staff > New staff member.
- Scroll to the Emergency contact section.
- Enter Emergency contact name, Emergency contact phone, and Emergency contact relationship.
- Click Create.
After the staff member exists:
- Open the staff member.
- On Details, click Emergency contact.
- Click Add emergency contact.
- Enter the contact name, phone, and relationship.
- Click Save emergency contact.
View emergency contact
Existing emergency contact details are not shown until you confirm secure access.
- Open the staff member.
- On Details, click Emergency contact.
- Click View emergency contact.
- Read the notice, enter a Reason for access, and tick I understand this information must be kept secure.
- Click Confirm and view.
- Review the contact details in the modal.
- Click Close when finished.
Your access is recorded in the staff member Activity log when the contact details are shown, including the reason you entered.
Only access when needed
Emergency contact details are sensitive. Only open them when you need to, and only share them when necessary. All access is logged.
Update emergency contact
- Open the staff member.
- On Details, click Emergency contact.
- Click Update emergency contact.
- Enter a Reason for access and confirm you will keep the information secure.
- Click Continue.
- Update the contact name, phone, or relationship.
- Click Save emergency contact.
The change and your reason are recorded in the staff member Activity log.
Member app
Staff can view and update their own emergency contact in the member app without going through the platform access steps above.
Driving licence and sign-off
Staff who drive need a valid licence and sign-off before they can be booked.
- Open the staff member.
- Go to the Driving licence tab.
- Add or update licence details and record licence checks.
- Click Sign off for driving on the Driving licence tab (or on the Options tab) when approved.
See Managing Members for the full licence workflow — the steps are the same on staff records.
Staff compliance
For staff marked as Staff driver, record DBS, right to work, and First Aid checks on the Compliance tab:
- Open the staff member.
- Go to the Compliance tab.
- Click Record DBS, Record Right to work, or Record First Aid.
- Enter check and expiry dates and upload documents if needed.
- Save the record.
Configure default DBS and First Aid validity in Settings > Updating Options > Members tab.
Set availability
Staff drivers can have regular weekly hours and one-off exceptions.
- Open the staff member.
- Go to the Availability tab.
- Set Normal availability for each day of the week.
- Use Extras to add exceptions such as holiday or extra shifts.
- Click Save availability.
Quick actions for common changes
Use Quick actions on the Availability tab for shortcuts such as Report sick today or Add on holiday this week.
If saving would clash with existing bookings, a confirmation appears so you can review affected trips before continuing.
Complete training
When training is required, complete checklists on the Training tab — the same as for members. See Managing Checklists.
Disable staff
- Open the staff member.
- Go to the Options tab.
- Click Disable member.
List columns
These are the columns available and a small description of each one.
| Column | Description |
|---|---|
| Types | Staff driver and/or volunteer driver. |
| Available | Whether the driver is marked available this week. |
| Training | Training checklist completion status. |
| Compliance | DBS, right to work, and First Aid status for staff drivers. |
| Licence | Driving licence status and check history. |
| Sign-off | Whether the driver is signed off to drive. |
Related guides
- Managing Members — non-driver and driver members
- Audit Log — team-wide history including emergency contact access
- Internal Bookings — staff driver assignment
- One-to-One Bookings — volunteer driver assignment
- Group Bookings — staff driver on the Drivers schedule calendar