

Appearance
Managing Members
Add and maintain the people who use your transport service — passengers, driver members, and group members linked to organisations.
View members
- Go to Operations.
- Click Members.
- Review the list or open a tab to focus on one member type:
- All members
- Non-Driver member
- Group member
- Driver member
Use Filters to find members with training, licence, sign-off, or subscription issues. The dashboard Members widget also shows a No subscription issue badge.
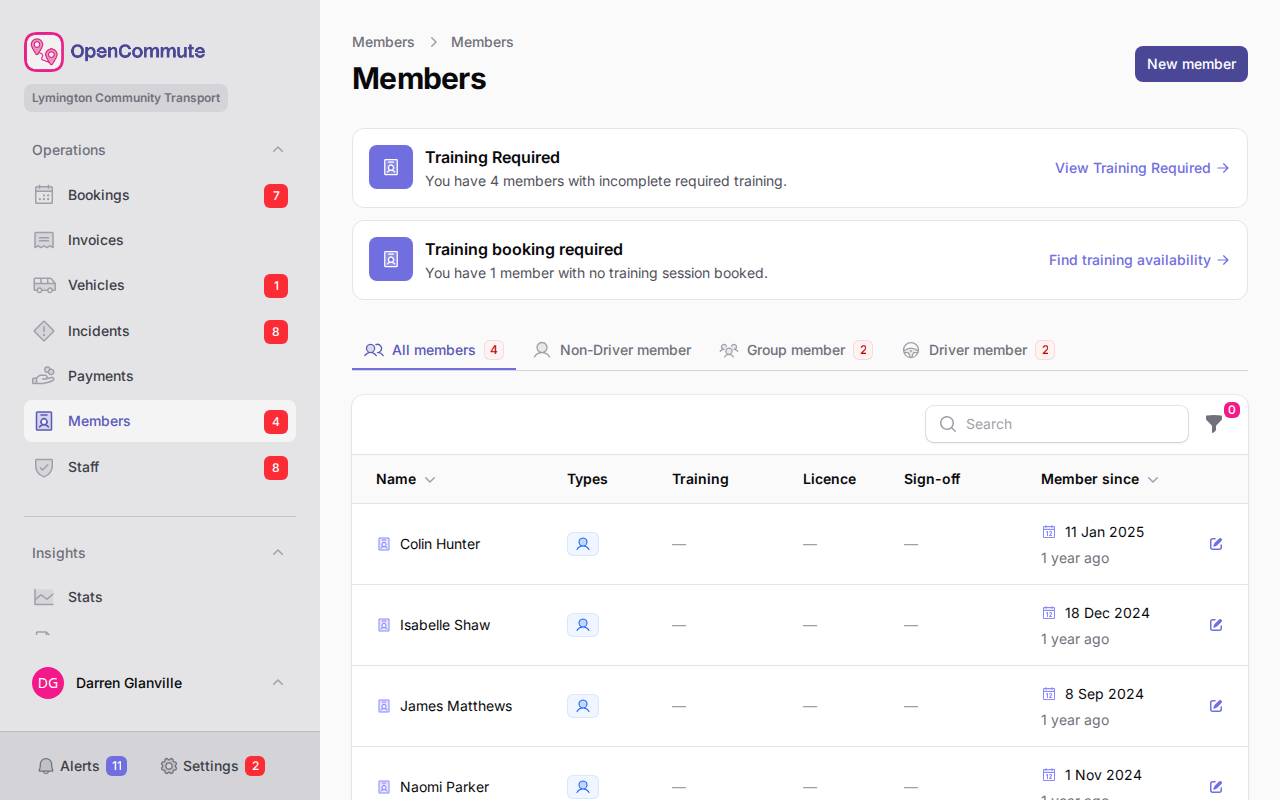 An example of the Members list showing member types and compliance status.
Add a member
- Go to Operations.
- Click Members.
- Click New member.
- Enter Name and Email.
- Tick one or more Member types:
- Non-Driver member — a passenger who can be booked on open or one-to-one trips
- Group member — linked to an organisation for group bookings
- Driver member — can hire a vehicle on driver own bookings
- If Group member is ticked, select an Organisation.
- Optionally set a Home location on the map.
- Click Create.
When your team has an operational area switched on and the home address is outside that area, a warning appears. Click Create, turn on the confirmation in the dialog, then click Create member. That decision is recorded on the member Activity log.
Member types can overlap
One person can have more than one type — for example, a Driver member who is also a Non-Driver member on other trips.
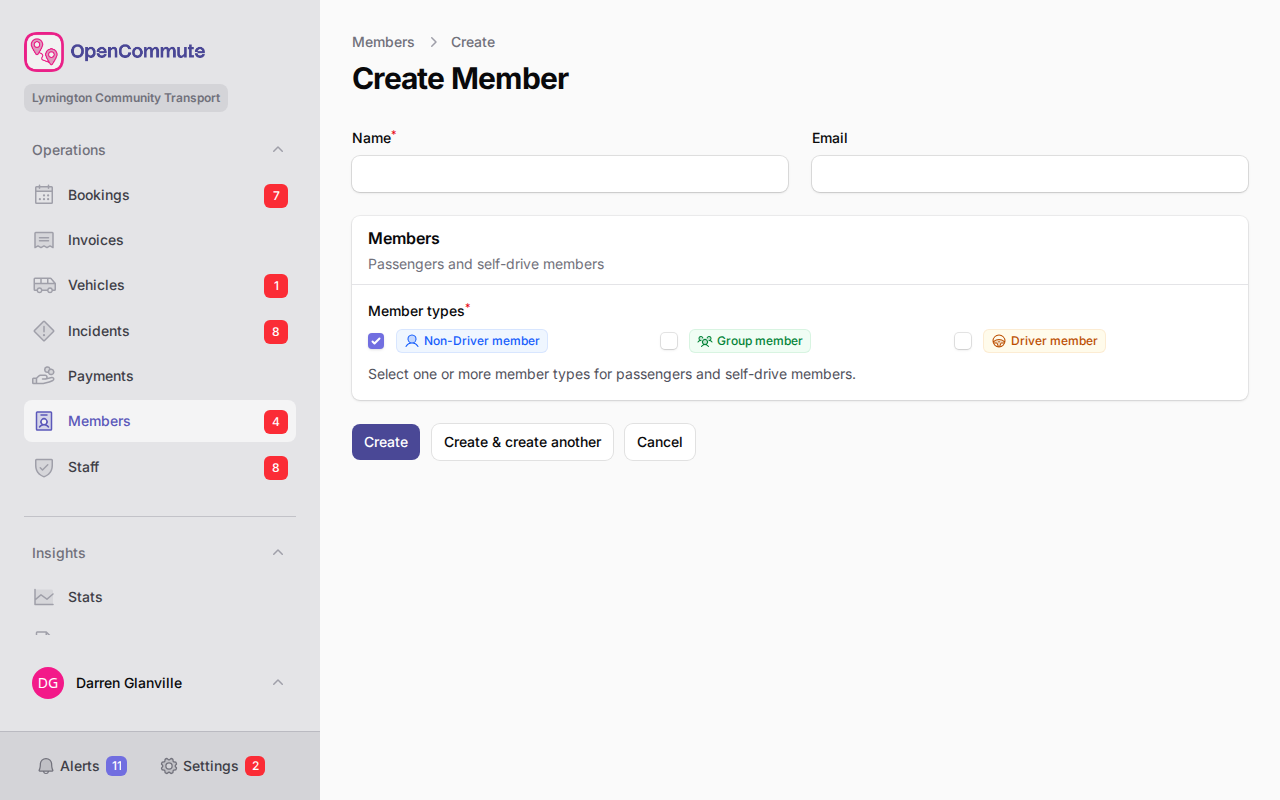 An example of creating a member with name, email, and member types.
Photo
Add an optional photo. Images are automatically resized to a maximum of 800px.
When creating a member:
- Go to Operations > Members > New member.
- Upload a JPEG, PNG, or WebP file in the Photo field to the left of Name.
- Click Create.
On an existing member:
- Open the member.
- On Details, click Add photo or Change photo.
- Upload a JPEG, PNG, or WebP file.
- Click Save photo.
The photo is shown to the left of Name on the member record. Only signed-in team members can open the stored file.
Contact details
Use the Contact section on the Details tab to store a phone number and driver notes.
- Open the member (or enter these fields when creating a new member).
- On Details, find the Contact section.
- Enter Phone number and Driver notes as needed.
- Click Save on the member record.
Driver notes are shown to volunteer drivers and staff drivers on bookings for this member — for example, boarding help or vehicle preferences.
Who can see contact details
Only platform users, volunteer drivers, and staff drivers can view phone numbers and driver notes.
Emergency contact
Members can store an emergency contact in the member app. On the platform, emergency contact details are opened from Details and are protected by an access log.
Add emergency contact
You can add emergency contact details when creating a member, or later from the Emergency contact button on Details.
When creating a member:
- Go to Operations > Members > New member.
- Scroll to the Emergency contact section.
- Enter Emergency contact name, Emergency contact phone, and Emergency contact relationship.
- Click Create.
After the member exists:
- Open the member.
- On Details, click Emergency contact.
- Click Add emergency contact.
- Enter the contact name, phone, and relationship.
- Click Save emergency contact.
 An example of the Emergency contact modal when no details are on file.
View emergency contact
Existing emergency contact details are not shown until you confirm secure access.
- Open the member.
- On Details, click Emergency contact.
- Click View emergency contact.
- Read the notice, enter a Reason for access, and tick I understand this information must be kept secure.
- Click Confirm and view.
- Review the contact details in the modal.
- Click Close when finished.
Your access is recorded in the member Activity log when the contact details are shown, including the reason you entered.
Only access when needed
Emergency contact details are sensitive. Only open them when you need to, and only share them when necessary. All access is logged.
Update emergency contact
- Open the member.
- On Details, click Emergency contact.
- Click Update emergency contact.
- Enter a Reason for access and confirm you will keep the information secure.
- Click Continue.
- Update the contact name, phone, or relationship.
- Click Save emergency contact.
The change and your reason are recorded in the member Activity log.
Member app
Members can view and update their own emergency contact in the member app without going through the platform access steps above.
Set a home location
Members who need a pickup address can have a home location on their record. You can set it when creating a member, or later from Details.
- Open the member.
- On Details, click Home location.
- Set the address on the map.
- Click Save home location.
To remove it, click Clear home location.
If an operational area is switched on and the address is outside it, a warning appears. Click Save home location, turn on the confirmation in the dialog, then click Save home location again. That decision is recorded on the member Activity log, and the member list shows an outside-area icon. Use the Outside operational area filter to find these members.
Driving licence and sign-off
For Driver member and Group member types that will drive, complete the Driving licence tab:
- Open the member.
- Go to the Driving licence tab.
- Click Add driving licence (or Edit driving licence).
- Enter Licence number, Expiry date, Licence categories, and upload photos if needed.
- Click Add License or Save License.
- Click Record licence check when a check is done.
- Click Sign off for driving on the Driving licence tab (or on the Options tab) when the member is approved to drive.
Sign-off is required for booking
Members without a valid licence check and driving sign-off cannot be selected as drivers on bookings. See Driver Own Bookings and Group Bookings.
Complete training
When your team requires training before assignment, use the Training tab:
- Open the member.
- Go to the Training tab.
- Complete each checklist item for their member type.
- Save as you go.
Turn checklist training on or off in Settings > Updating Options > Members tab.
Training booking requirement
Some teams also require members to pass a training booking before they can be signed off or assigned as drivers. This is configured separately from checklist training under Member types requiring a passed training booking in Updating Options.
- Schedule a training booking with the member as an attendee.
- Complete the session and mark the attendee as Pass on the booking Attendees tab.
When no session is booked yet, the member Details tab shows a warning with suggested slots for next week. You can also book from the Training tab, or use Find availability with booking type Training.
To waive the requirement for an individual, open the member, go to Options, click Override training booking requirement, enter a reason, and confirm. Any upcoming training bookings for that member are cancelled automatically. Use Revoke training booking override to restore the requirement later.
Training tab vs training bookings
The Training tab records checklist items. Training bookings are separate sessions with pass or fail sign-off. Both may be required depending on your team settings.
Subscriptions
Members need a paid subscription before they can be added to Open bookings, request a One-to-One trip, or hire a vehicle on a Driver Own booking. Staff, Internal, Block, and Training bookings are not gated. If a member who needs a subscription has none, or their invoice is unpaid, an alert on their record explains they need a paid subscription before they can be added to bookings. Use Subscription on the alert to open the Subscription tab.
If a member already has an upcoming booking and their subscription later lapses, the booking shows a warning. When Draft auto-cancel is on, One-to-One and Driver Own bookings in that cancel window are cancelled automatically — the notice says The member is not subscribed. — and the member is removed from Open bookings. Early open-booking invoices for that member are voided before the invoice period starts, with any payment moved to account credit. Cancelled subscriptions stay valid until the paid period ends, so those bookings are left alone. See Managing Bookings for the other cancellation notices.
- Open the member.
- Go to the Subscription tab.
- Click Start subscription. If the team offers both intervals, choose Monthly (calendar month) or Yearly (calendar year). The available intervals are set in Settings > Updating Options > Members.
- Confirm that an invoice will be generated for the amount shown, covering the current period until the end date shown, then click Start subscription. The invoice is created at the full period price set in Settings > Prices. The member can be booked once that invoice is Paid.
Renewal invoices are generated automatically before the next period starts. Cancel a subscription to stop future invoices — access remains until the current paid period ends. Unpaid renewal invoices for periods that have not started yet are voided. If the member had already paid part of a future renewal, that amount becomes account credit. Fully paid future periods keep coverage. During the current paid period an alert on the member record shows the end date. Use Renew on the Subscription tab (or on the alert) to resume renewals without creating another invoice.
To allow bookings without payment, use Override subscription requirement, enter a reason and an expire date, and confirm the toggle. The override stays in force through the expire date, then switches off. The expire date is shown on the Subscription tab. Use Revoke subscription override to restore the requirement sooner. Starting a subscription also revokes any override.
The members list includes a Subscription column and filter: Active, Unpaid, Cancelled, None, or Overridden. A cancelled subscription stays valid until the paid period ends.
Account credit
When a member is removed from a chargeable open booking before the invoice period starts, any payment on their invoice is moved to their account as credit. The same happens when unpaid open-booking place expiry voids a partially paid invoice, and when cancelling a membership subscription voids a partially paid future renewal.
- Open the member.
- An alert on the Details tab shows the available balance when they are in credit.
- Click the Credits tab to see the history. Booking names in that table open the related booking.
Credit is applied automatically to the member’s next invoice, and to any invoice that is already unpaid.
See Open Bookings — Remove a member and Updating Options — Open booking invoicing.
Disable a member
- Open the member.
- Go to the Options tab.
- Click Disable member.
Disabled members stay on record but cannot be used on new bookings. Click Enable member to restore access.
List columns
These are the columns available and a small description of each one.
| Column | Description |
|---|---|
| Subscription | Whether the member has a paid, unpaid, cancelled, missing, or overridden subscription. |
| Types | The member types assigned to this person. |
| Training | Whether required training is complete or still needed. |
| Licence | Licence status and any issues. |
| Sign-off | Whether the member is signed off to drive. |
| Member since | When the member was added to your team. |
Related guides
- Managing Staff — staff drivers and volunteer drivers
- Updating Options — operational area and other team settings
- Audit Log — team-wide history including emergency contact access
- Managing Organisations — organisations for group members
- Managing Checklists — training checklist templates
- Managing Invoices — invoices and account credit payments
- Stats Overview — subscription status charts
- Reports Overview — printable membership subscriptions report
- Open Bookings — chargeable places and invoice period
- One-to-One Bookings — member trips with volunteer drivers
- Driver Own Bookings — driver member vehicle hire